




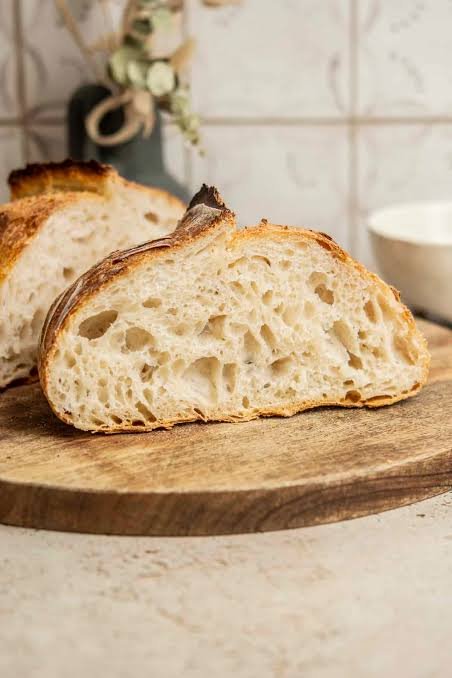
Sourdough bread is one of the oldest and most rewarding forms of bread making. Unlike breads made with commercial yeast, sourdough relies on a natural starter containing wild yeast and beneficial bacteria. This fermentation process creates bread with a crisp crust, chewy crumb, complex flavor, and improved keeping quality. Although sourdough requires more time than conventional bread, the hands-on work is minimal, and the results are well worth the effort.
This recipe produces one medium artisan loaf with a golden crust, an airy interior, and a balanced tangy flavor. It is suitable for beginners while also following techniques used by experienced bakers.
Ingredients
For the Dough
- 500 g bread flour (12–13% protein)
- 350 g lukewarm water
- 100 g active sourdough starter
- 10 g fine sea salt
Optional Ingredients
- 10 g olive oil for a slightly softer crumb
- Rice flour for dusting the proofing basket
- Sesame seeds, oats, or poppy seeds for topping
Equipment Needed
- Digital kitchen scale
- Large mixing bowl
- Dough scraper
- Banneton basket or bowl lined with a clean towel
- Dutch oven with lid
- Bread lame or sharp razor blade
- Cooling rack
Preparing the Starter
A healthy starter is essential for successful sourdough bread. Feed your starter approximately 4–6 hours before mixing the dough, depending on room temperature. It should become bubbly, double in size, and have a pleasant, slightly sour aroma. If the starter is weak or inactive, the dough may not rise properly.
Step 1: Mix the Dough
Pour the lukewarm water into a large mixing bowl. Add the active sourdough starter and stir until it is mostly dissolved.
Gradually add the bread flour while mixing with your hand or a sturdy spoon. Continue mixing until all the flour is hydrated and no dry patches remain. The dough will appear rough and sticky, which is perfectly normal.
Cover the bowl with a damp towel or plastic wrap.
Step 2: Autolyse
Allow the dough to rest for 30–45 minutes.
This stage, called the autolyse, allows the flour to absorb water completely. During this resting period, gluten begins developing naturally, making the dough smoother, easier to handle, and more extensible. Skipping this step won’t ruin the bread, but it significantly improves texture and structure.
Step 3: Add the Salt
Sprinkle the salt evenly over the dough.
Wet your hands and gently squeeze, fold, and knead the dough until the salt is completely incorporated. The dough may feel slippery at first, but after several minutes it will become smoother and stronger.
Cover the bowl once more.
Step 4: Bulk Fermentation
Bulk fermentation is the primary rising stage.
Allow the dough to ferment at room temperature for approximately 4–6 hours. The exact time depends on the temperature of your kitchen. Warmer kitchens shorten fermentation, while cooler kitchens require additional time.
During the first two hours, perform a series of stretch-and-folds every 30 minutes.
To perform a stretch-and-fold:
- Wet your hands.
- Lift one side of the dough.
- Stretch it gently upward.
- Fold it over the center.
- Rotate the bowl one-quarter turn.
- Repeat until all four sides have been folded.
Each round strengthens the gluten network without intensive kneading.
After completing four rounds, allow the dough to continue fermenting undisturbed until it has increased by about 50 percent in volume. The dough should appear puffy, smooth, and slightly domed with small bubbles visible near the edges.
Step 5: Pre-Shaping
Lightly flour your work surface.
Carefully transfer the dough onto the counter, trying to preserve as much air as possible.
Using a dough scraper, gently fold the edges toward the center to create a loose round.
Rotate the dough against the countertop using light tension until a smooth surface forms.
Allow the dough to rest uncovered for 20–30 minutes.
This bench rest relaxes the gluten, making final shaping much easier.
Step 6: Final Shaping
Dust the top of the dough lightly with flour.
Turn it upside down so the floured side rests on the work surface.
Fold the bottom edge upward, then fold both sides inward before rolling the dough tightly into a ball or oval.
Use gentle pressure while dragging the dough across the countertop to build surface tension.
Place the shaped dough seam-side up into a floured banneton basket or a bowl lined with a generously floured kitchen towel.
Step 7: Final Proof
Cover the dough with a towel or plastic wrap.
You have two proofing options:
Same-day proof
Allow the dough to rise at room temperature for 2–3 hours until slightly puffy.
Cold proof
Refrigerate the dough for 8–16 hours.
Cold fermentation develops a richer flavor, improves crust color, and makes the dough easier to score before baking.
To test readiness, gently press the dough with a fingertip. If the indentation slowly springs back while remaining slightly visible, the dough is ready for baking.
Step 8: Preheat the Oven
Place a Dutch oven with its lid inside the oven.
Preheat to 250°C (480°F) for at least 45 minutes.
A thoroughly heated Dutch oven traps steam released from the dough, helping produce excellent oven spring and a crisp artisan crust.
Step 9: Score the Dough
Turn the dough onto a sheet of parchment paper.
Using a bread lame or sharp razor blade, make one confident slash approximately 1 cm (½ inch) deep across the top.
Decorative scoring patterns may also be added, but one primary expansion cut is sufficient for beginners.
Scoring directs the expansion of the loaf during baking and prevents random cracks.
Step 10: Bake
Carefully lower the dough and parchment into the hot Dutch oven.
Cover immediately with the lid.
Bake for:
- 20 minutes with the lid on
- Reduce the temperature to 230°C (445°F)
- Remove the lid
- Bake another 20–25 minutes
The finished loaf should have a deep golden-brown crust.
The internal temperature should reach approximately 96–99°C (205–210°F) when measured with an instant-read thermometer.
Step 11: Cooling
Transfer the baked loaf to a wire rack.
Allow it to cool for at least one hour before slicing.
Although freshly baked bread smells irresistible, slicing too early releases steam that is still setting the crumb, resulting in a gummy texture.
Tips for Success
- Always use an active, recently fed starter.
- Weigh ingredients with a digital scale for accuracy.
- Handle the dough gently to preserve trapped gas.
- Avoid adding too much extra flour during shaping.
- Fermentation time depends more on dough temperature than the clock.
- An overnight cold proof enhances flavor and improves scoring.
- Practice makes a noticeable difference; each loaf helps build experience.
Storage
Store sourdough bread at room temperature in a bread box, paper bag, or wrapped in a clean kitchen towel for up to three days. Avoid refrigeration, as it accelerates staling. For longer storage, slice the loaf and freeze it in an airtight freezer bag for up to three months. Individual slices can be toasted directly from frozen without thawing.
Serving Suggestions
Fresh sourdough is delicious with butter, olive oil, jam, or honey. It also makes excellent toast, sandwiches, grilled cheese, bruschetta, garlic bread, and croutons. Day-old sourdough can be transformed into breadcrumbs, stuffing, bread pudding, or French toast, ensuring nothing goes to waste.
Conclusion
Making classic sourdough bread is a rewarding process that combines simple ingredients with time and patience. By carefully feeding the starter, allowing proper fermentation, strengthening the dough through stretch-and-folds, and baking in a preheated Dutch oven, you can produce bakery-quality bread at home. Each loaf will teach you more about fermentation, dough handling, and baking techniques. With regular practice, you’ll develop the confidence to experiment with different flours, hydration levels, and shaping methods, creating sourdough loaves that are uniquely your own while preserving the timeless tradition of naturally leavened bread.
