





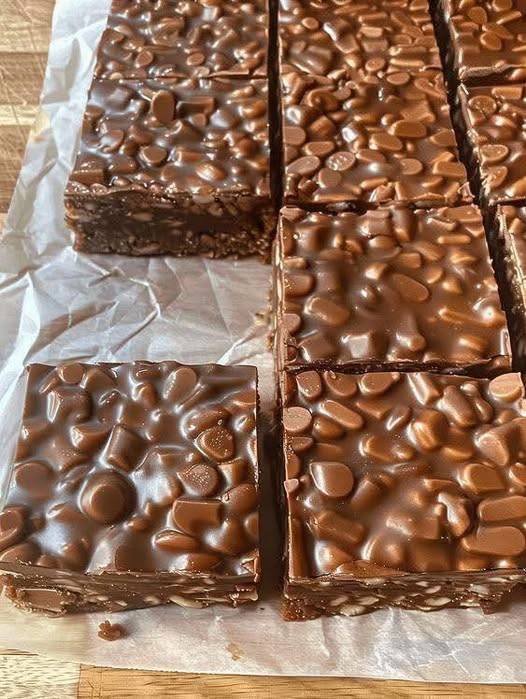
Chocolate peanut butter crunch bars are an irresistible dessert that combines the rich flavors of chocolate, creamy peanut butter, and a satisfying crunchy texture. These homemade bars are the perfect balance of sweet, salty, creamy, and crisp. Unlike no-bake versions, baked chocolate peanut butter crunch bars develop a deeper flavor as the ingredients come together in the oven, creating a deliciously chewy base with a rich topping.
These bars are ideal for parties, bake sales, family gatherings, holiday dessert tables, or simply as a special homemade treat. The combination of chocolate and peanut butter is a classic favorite loved by both children and adults. The addition of crunchy ingredients such as crispy rice cereal, chopped peanuts, or crushed cookies gives these bars an enjoyable texture that makes every bite exciting.
Whether you are an experienced baker or a beginner, this recipe is straightforward and uses simple ingredients. With a buttery crust, creamy peanut butter layer, and decadent chocolate topping, these bars are guaranteed to become a favorite dessert in your recipe collection.
Why You’ll Love This Recipe
Chocolate peanut butter crunch bars are popular because they offer several delicious elements in one dessert:
- A buttery baked base with a soft, chewy texture
- A smooth peanut butter filling
- A rich chocolate topping
- A crunchy layer for extra texture
- Easy preparation with everyday ingredients
- A dessert that stores well and can be made ahead
These bars are also highly customizable. You can add nuts, caramel, coconut, or different types of chocolate to create your own signature version.
Ingredients
For the Base Layer
- 1½ cups all-purpose flour
- ½ cup granulated sugar
- ½ cup unsalted butter, melted
- ¼ teaspoon salt
- 1 teaspoon vanilla extract
For the Peanut Butter Crunch Layer
- 1 cup creamy peanut butter
- ½ cup brown sugar
- 2 large eggs
- 1 teaspoon vanilla extract
- 2 cups crispy rice cereal
- ½ cup chopped roasted peanuts (optional)
For the Chocolate Topping
- 1½ cups semi-sweet chocolate chips
- ½ cup milk chocolate chips
- 2 tablespoons peanut butter
- 1 teaspoon vegetable oil or coconut oil
Optional Decorations
- Chopped peanuts
- Sea salt flakes
- Chocolate drizzle
- Mini chocolate chips
Equipment Needed
- 9×13-inch baking pan
- Mixing bowls
- Electric mixer or whisk
- Rubber spatula
- Measuring cups and spoons
- Baking paper
- Microwave-safe bowl or double boiler
- Cooling rack
Step 1: Prepare the Oven and Baking Pan
Preheat your oven to 350°F (175°C).
Line a 9×13-inch baking pan with parchment paper, leaving some extra paper hanging over the sides. This makes it easier to remove the bars after baking.
Lightly grease the parchment paper to prevent sticking.
Step 2: Make the Buttery Base
In a medium bowl, combine the melted butter, sugar, vanilla extract, and salt.
Add the flour and mix until a soft dough forms.
The mixture will look slightly crumbly at first, but it should come together when pressed.
Transfer the dough into the prepared baking pan and press it evenly across the bottom.
Use the back of a spoon or the bottom of a measuring cup to create a smooth, firm layer.
Bake the crust for 12–15 minutes until it is lightly golden around the edges.
Remove from the oven and allow it to cool slightly while preparing the peanut butter layer.
Step 3: Prepare the Peanut Butter Crunch Filling
In a large mixing bowl, combine the peanut butter and brown sugar.
Beat until smooth and creamy.
Add the eggs one at a time, mixing well after each addition.
Stir in vanilla extract.
Fold in the crispy rice cereal and chopped peanuts if using.
The cereal creates the signature crunch that makes these bars unique. Make sure it is evenly coated with the peanut butter mixture.
Step 4: Add the Peanut Butter Layer
Spread the peanut butter mixture evenly over the partially cooled crust.
Use a spatula to smooth the surface.
Return the pan to the oven and bake for another 15–20 minutes.
The filling should look set around the edges and slightly soft in the center.
Avoid overbaking, as the bars will continue to firm as they cool.
Step 5: Prepare the Chocolate Topping
While the bars cool, prepare the chocolate topping.
Place the chocolate chips, peanut butter, and oil in a microwave-safe bowl.
Microwave in 20–30 second intervals, stirring after each interval, until the chocolate is completely melted and smooth.
You can also melt the chocolate using a double boiler by placing the bowl over gently simmering water.
The peanut butter helps create a smooth, creamy chocolate layer that remains easy to slice.
Step 6: Add the Chocolate Layer
Pour the melted chocolate mixture over the cooled peanut butter layer.
Spread evenly with a spatula.
Sprinkle chopped peanuts, sea salt, or extra chocolate chips on top if desired.
Allow the topping to set at room temperature for about 15 minutes, then refrigerate the bars for at least 1–2 hours until completely firm.
Step 7: Slice and Serve
Once chilled, lift the bars from the pan using the parchment paper.
Place them on a cutting board.
Use a sharp knife to cut into squares or rectangles.
For cleaner slices, warm the knife slightly and wipe it between cuts.
Serve chilled or allow them to sit at room temperature for a few minutes before serving for a softer texture.
Tips for Perfect Chocolate Peanut Butter Crunch Bars
Use Good-Quality Peanut Butter
Choose a creamy peanut butter that blends smoothly. Natural peanut butter may separate and affect the texture unless mixed very well.
Do Not Overbake
Overbaking can make the bars dry instead of chewy and soft.
Cool Completely Before Cutting
The chocolate topping needs time to firm up. Cutting too early may cause the layers to separate.
Press Layers Evenly
Keeping each layer even ensures every bite contains the perfect balance of crust, peanut butter, crunch, and chocolate.
Add a Pinch of Salt
A small amount of salt enhances both the chocolate and peanut butter flavors.
Delicious Variations
Chocolate Peanut Butter Pretzel Bars
Add crushed pretzels to the peanut butter layer for a salty crunch.
Double Chocolate Crunch Bars
Add cocoa powder to the base layer and use dark chocolate for the topping.
Caramel Peanut Butter Bars
Drizzle caramel sauce between the peanut butter and chocolate layers.
Peanut Butter Cookie Crunch Bars
Replace crispy rice cereal with crushed peanut butter cookies.
Nut-Free Version
Use sunflower seed butter and replace peanuts with toasted seeds.
Serving Suggestions
Chocolate peanut butter crunch bars are delicious served with:
- Vanilla ice cream
- Whipped cream
- Fresh strawberries
- Hot coffee
- Milk
- Hot chocolate
They are also excellent additions to dessert platters and holiday cookie trays.
For gifting, wrap individual bars in parchment paper and place them in decorative boxes or tins.
Storage Instructions
Store the bars in an airtight container in the refrigerator for up to 1 week.
For longer storage, freeze them in a freezer-safe container for up to 3 months.
Place parchment paper between layers to prevent sticking.
Allow frozen bars to thaw in the refrigerator before serving.
Common Mistakes to Avoid
One common mistake is adding the chocolate topping while the peanut butter layer is still warm. This can cause the chocolate to melt into the filling instead of creating a separate layer.
Another mistake is using too much cereal, which can make the bars dry and difficult to slice. Measure ingredients carefully for the best texture.
Avoid cutting the bars before they are fully chilled, as the layers need time to set properly.
Approximate Nutrition (Per Bar)
Makes about 24 bars.
- Calories: 260
- Carbohydrates: 28 g
- Protein: 6 g
- Fat: 15 g
- Saturated Fat: 6 g
- Sugar: 18 g
- Fiber: 2 g
- Sodium: 120 mg
(Nutrition values may vary depending on ingredients and portion size.)
Final Thoughts
Baked chocolate peanut butter crunch bars are the perfect dessert for anyone who loves the classic combination of chocolate and peanut butter. The buttery crust, creamy peanut butter filling, crunchy texture, and smooth chocolate topping create a dessert that is rich, satisfying, and unforgettable.
Easy enough for everyday baking but impressive enough for special occasions, these bars are sure to become a recipe you return to again and again. Whether shared with family, served at celebrations, or enjoyed as a personal treat, chocolate peanut b
